This little lady was already out sick this past week with some cold/sinus/bronchial nonsense. Not fun!
Despite the sadness that Summer is GONE and Fall has arrived, I'm not going to lie, I'm doing a LITTLE happy dance!! We don't have air conditioning in our building and those first few weeks of school are SO hard for my kids. So I am welcoming mother nature and all her cold fierceness. Bring it on!!
Another sign that Fall is here came while browsing the aisles of Target this weekend. Halloween costumes ALREADY? AHH! Now that I am not ready for!! But, all that festive spirit has put me in a Halloween mood and I figured I might as well jump on the spooky bandwagon and start planning for my classroom! I have a student this year with a gluten allergy, so her mom has been so sweet to offer to bring in a craft for all of the students instead of treats. I'm not quite sure what it is yet, but it will help ease the stress of planning a craft for my kids that day. Stay tuned for that idea coming soon!
Being that Halloween is in the middle of the week this year, I wanted to OVER-plan. With 5th graders all hyped up on sweets and spooky things, I will definitely be in for a crazy week!
I want to share two new products that I have been working on with everyone. The first is a Halloween Mystery Picture Coordinate Graphing packet. It includes 4 different coordinate graphing "mystery pictures" for my students to work on. I told them about this last week and they were SO excited! The fact that I tell them they are doing higher level math skills by plotting ordered pairs to reveal a mystery picture, makes them feel super cool! I created this to align with Common Core Math, so its not just a "fluff" Halloween activity! LOVES IT!!! Check out some of the pages below and click HERE or the pictures below to check it out!


The task cards are AWESOME. I will laminate the cards and allow students to complete them with dry-erase markers at their seat. Honest to goodness, (I know I say this a lot), but my kids think this is SO COOL. Trust me, if you teach 5th grade, you can probably relate that switching things up JUST A BIT = coolness. I let my kids work on the task cards at their seats during math when they finish their assignments early and I even let some students take them home to work on them with their family (which they love!!). I have 36 pages of task cards which is a total of 144 individual task cards. Each page is different in that students have to write decimals in standard form, word form, and standard form. I made sure to leave enough room for students to write on the task cards and included instructions right on the cards so students can work independently with these!

Then, I thought I would take the task cards a step further and turned them into a memory matching game. The beauty is that the memory matching game has 3 matching cards (match the standard form to the word form to the expanded form). For my higher kids, I plan to challenge them and get them to match all 3 when playing. For my students that may need a bit more help, I can figure out what it is they need help with (do they need practice with standard form? Do they need practice with expanded form?) and I can pull a set out so that these students only have to find a pair of 2 matching cards. Make sense?!?!


While creating these task cards and memory matching game in my obnoxious Halloween spirit, I thought to myself that the chances of us needing to review these MANY times throughout the year is probably a pretty good one, so I went ahead and made them in black and white so they can work for us all year. Click HERE or the pictures above to check this product out!!
Next, I want to share a SUPER simple idea that I *kind of* got out in the bloggy world. I can't quite remember where I got this amazing idea (as always!), but it really is genius!
Creating a little home away from home in my classroom is SO important, not just for me, but for my kids too. When they love their classroom, you can feel it. There is a sense of ownership and you can tell they love to be there everyday. I try to add little homey touches here and there to make my room nice and cozy. :)
One new thing I did this year was hang up pictures on our walls. Our walls are cinderblocks and initially I was thinking there was NO way I was going to be able to hang these up. But, with some trial and error, and a few trips to Jo-Ann's, we have success!!
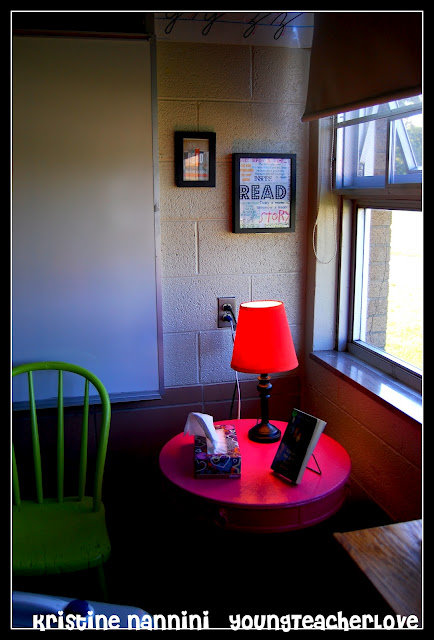
I know I have shared this photo of our cozy little reading corner, but I have received so many sweet emails about it that I figured I would show you the process of how to hang these frames up.
First things first, you need to purchase these Command hooks. I got mine from Jo-Ann's, but I have seen them everywhere (Target, Michael's, etc.)

These are the ones I purchased, and I want to say they cost no more than $6.00.
When you open the package, the "hooks" are attached to each other, and you have to separate them. Then when you separate them, you will have 1 side with a peel-able sticky back and another side with a velcro-like feel to it. You will want to take 2 different hooks and connect them on the "velcro-like" side. They will "click" into each other (make sure they are perfectly lined up because once you "click" them into place you really can't take them apart. Here is a picture of the 2 hooks attached to each other:

Now that the two "velcro-like" ends are attached, both the top and the bottom should have the peel back paper that reveals a sticky surface. Go ahead and peel the paper off one end. Once you have peeled back the paper, you are going to stick the sticky side (obviously!) of the hooks in the center/top of your picture frame. I used two hooks (one on the bottom and one on the top for extra support):

Once they are attached to your frame, go ahead and peel back the paper on the other side, stick it to your wall, and YOU ARE DONE!!!

This one you can see in this photo, but due to the width of the frame, you can't see it in person. I have these little dollar store frames all around my room to add a touch of homey-coziness! Not to mention they are constant sources of inspiration and motivation for my students, because they are filled with positive quotes (the perfect little pick-me-up while you're drying your hands at the sink!!)
I'd love to know what types of things you do in your classroom to make your students feel more comfortable or cozy!